Thermal Bridge Mistakes Around Window Replacement
Replacing windows in a Dutch home is one of the most transformative renovation steps you can take. It promises better comfort, lower energy bills, and a refreshed appearance. Yet all too often, the full potential of new HR++ or triple glazing is squandered by invisible flaws at the edges. The culprit is the thermal bridge—a direct path for heat to bypass your insulation. When window detailing is mishandled, even the best glazing can’t stop significant heat loss. This article lays bare the mistakes that plague insulation connection details around windows in Dutch renovations, and shows you exactly what to demand from your building team.
Basic Concepts: What You’re Really Fighting
A thermal bridge, or cold bridge, is any part of the building envelope where the thermal resistance is substantially lower than the surrounding area. In practical terms, it’s a spot where heat escapes much faster, cooling down the interior surface, condensing moisture, and wasting energy. Around a new window, the junction between frame, wall, and insulation is a classic weak point. The Dutch building code (Bouwbesluit) and BENG requirements set strict limits on linear thermal transmittance—the Ψ (psi) value—for such junctions. Yet site practices often lag behind.
Window detailing refers to the complete constructional solution: how the frame sits in the reveal, how the air and vapour control layers are joined, and how the external weatherproofing overlaps with the insulation. Heat loss through the window opening is not just about the U‑waarde of the glass and frame. It’s about the three‑dimensional flow of energy around the perimeter, where a discontinuity of just a few centimetres can double the total transmittance. Finally, the insulation connection is the critical seam between the wall’s insulation layer and the window frame. Get this seam wrong, and you create a thermal bridge that can cause mould, draughts, and a permanent cold spot on the inner wall.
Common Mistakes That Undermine Your Renovation
1. Breaking the Insulation Line at the Window Reveal
The most frequent error is a gap in the thermal envelope right where the window meets the wall. In Dutch cavity wall construction, the insulation layer sits in the cavity or is applied externally. When a new frame is installed, the installer often pushes it tight against the inner leaf, leaving the cavity insulation to stop short of the frame. The result is a direct cold bridge from the outside leaf to the inside through the frame edge. Even with insulated frames, the linear psi‑value can be three times higher than it should be.
Insist on an uninterrupted thermal barrier. In cavity walls, the window must be positioned so that the external insulation laps over the frame by at least 30 mm. For solid walls with interior insulation, the insulation must be meticulously butted and sealed to the side of the window jamb, with no air gap behind it. The same principle applies to sill and head details. Memory and photos from renovation sites show that this step is often skipped in the rush to close the façade. Make the insulation continuity a non‑negotiable checkpoint before any finishing is applied.
2. Ignoring the Airtightness and Vapour Control Junction
A thermal bridge becomes truly destructive when moist interior air reaches a cold surface and condenses. The connection between the window frame and the internal vapour‑tight layer (damp‑remmende laag) is often taped in a perfunctory way, or worse, left completely unsealed. In a typical Dutch renovation, the contractor may rely on expanding foam to fill the gap, but standard PU foam is not a vapour barrier. Over time, the foam can shrink, crack, and let moisture migrate into the wall assembly, where it condenses on the cold frame edge.
Demand a continuous air and vapour seal. Use a flexible, high‑performance sealing tape that adheres reliably to both the window frame and the internal wall surface—plaster, OSB, or brick. The tape must bridge the movement joint and remain flexible for decades. At the sill, a robust vapour‑resistant gasket and a sloping, well‑supported airtight membrane are non‑negotiable. Every interruption in this layer is an invitation for hidden damp and structural decay.
3. Forgetting the Thermal Break Under the Sill
The window sill is a classic trouble spot. In countless Dutch projects, a stone or concrete sill is bedded directly onto the outer leaf, creating a massive thermal bridge that spans from the cold exterior right through to the inner wall. Even when the wall insulation is otherwise perfectly continuous, an uninsulated sill can drop the interior surface temperature below dew point, causing persistent condensation on the interior window board and eventually staining.
Always specify a load‑bearing thermal break element under the sill—high‑density foam glass, Purenit, or a dedicated structural insulation block. The break must carry the weight of the sill and window without compressing, and it must connect seamlessly to the wall insulation. On the interior side, extend the insulation up to the underside of the window board. This detail is often overlooked in renovation because the existing doorpost or sill is reused; cut it back and introduce the thermal separation.
4. Relying on the Frame Alone to Kill the Bridge
Modern insulated window frames—wood/aluminium or fibreglass—claim low U‑values. But the centre‑of‑frame U‑value is not the whole story. The edge spacers, the connection to the wall, and the installation depth all affect the actual energy loss. A mistake we see repeatedly is the frame being installed flush with the exterior face of an uninsulated brick cavity wall, with all the insulation hastily crammed on the interior side. This creates a huge cold area around the frame outside the thermal envelope.
Position the window within the insulation plane, not at its edge. In a typical “buitengevelisolatie” (external wall insulation) renovation, the frame should be moved outward to sit in the insulation layer, or an insulated extension profile should be used to push the glazing plane forward. The goal is to wrap as much of the frame as possible in insulation, minimising the exposed metal or wood that can conduct cold. Mock up the detail in section, calculating the actual linear thermal transmittance, rather than assuming the frame alone solves the problem.
5. Poor External Weatherproofing That Doubles as a Thermal Leak
A surprising number of thermal bridges are hidden behind poorly detailed external flashings and cover strips. Aluminium drip profiles or zinc cappings are often screwed directly through the insulation into the cold structure, creating a line of point thermal bridges. In cavity walls, if the water‑repellent membrane is not tucked correctly into the window rebate, driven rain can saturate the insulation, reducing its effectiveness by up to 50%. Wet insulation is no insulation at all.
Specify thermally isolated fixings for any external metalwork. Ensure that the weathering membrane (damp‑open folie) at the jamb is carefully cut and sealed against the window frame with pre‑formed corner pieces. At the head, incorporate a ventilated cavity behind the cladding that breaks the capillary path, but never compromise the insulation coverage. The external detailing should be seen as part of the thermal protection system, not just rain defence.
Practical Tips for a Flawless Window Replacement
Every element of the window installation must be treated as a single system. Do not allow separate trades to work in isolation; the plasterer, the insulator, the window fitter, and the roofer all influence the thermal performance of that opening. Apply these principles rigorously when you brief your team and inspect the work.
- Model the junction. Before any work begins, ask for a Psi‑value calculation of the window‑wall connection. In Dutch practice, SBR‑detail references and the “knooppuntenmethode” from ISSO provide standard good solutions. If the detail is non‑standard—common in older Dutch homes—insist on a custom calculation. Do not proceed until the linear thermal transmittance is below 0.15 W/(m·K).
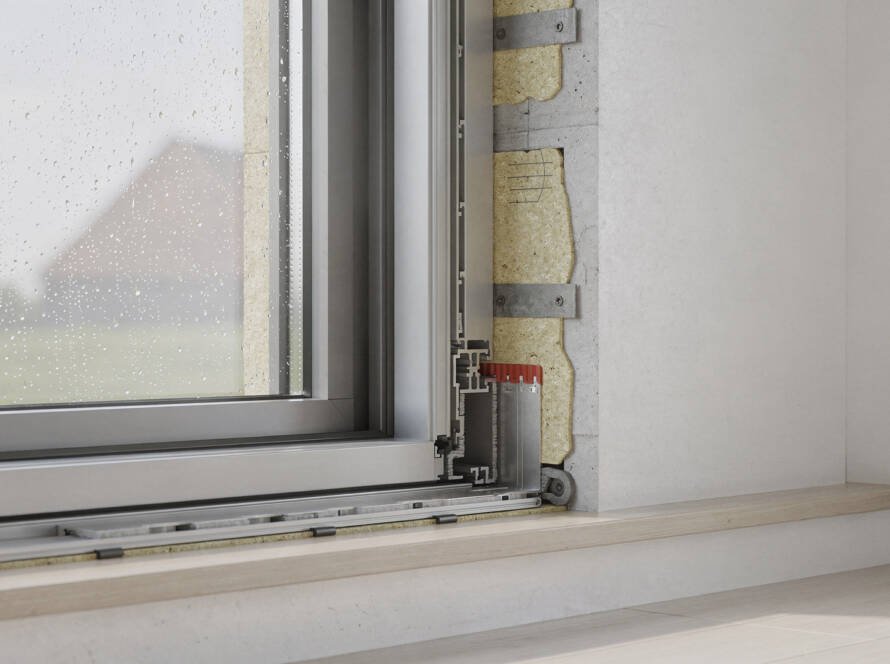
- Create a continuous insulation plane. Physically connect the wall insulation to the window frame over the full depth of the reveal. Use compressed insulation boards, rigid foam strips, or purpose‑made insulating brackets that are scribed and fixed without gaps. Mitre the corners and fill any voids with low‑expansion foam specifically formulated for airtight seals.
- Seal the airtightness layer with precision. Apply an approved vapour‑control tape around the entire perimeter, lapping it generously onto both the frame and the wall. At the sill, use a liquid‑applied membrane under the window board to tie the airtight layer to the frame. Pressurise the room during or after installation to check for leaks—smoke pencils are your friend.
- Install thermal break elements at all load‑bearing points. Under the sill, behind anchor brackets, and at any steel lintels, place compact, non‑compressible insulation. The material must have a compressive strength exceeding the applied load and a thermal conductivity below 0.05 W/(m·K). Insulate the inner reveal with a recognised reveal insulation board that butts tightly to the frame and is covered with plaster.
- Protect the perimeter insulation from moisture. Ensure the external damp‑open foil is continuous and correctly shingled. Overlap the window frame’s integrated weatherstripping, and fix any external cappings with stand‑off clips that create minimal thermal conduction.
Coordinate the sequence of works so that insulation and airtightness are completed and inspected before any covering or finishing goes on. Document the installation with photographs; a thermal imaging survey after completion is an excellent quality‑control tool that can reveal subtle thermal bridges invisible to the naked eye.
Conclusion
A window replacement that seems successful on the surface can harbour destructive thermal bridges for decades. In the Dutch climate, with its wet, windy winters, those bridges translate directly into higher energy consumption, comfort complaints, and hidden moisture damage. By understanding the common detailing errors—the broken insulation line, the neglected vapour seal, the uninsulated sill, the frame placed outside the thermal envelope, and the conductive fixings—you equip yourself to insist on correct solutions. The extra care in connecting the window to the wall’s insulation and airtightness layers pays back immediately with a warmer, healthier home and lower stookkosten. Renovation is an opportunity to build a seamless shell; treat the window opening not as a necessary interruption, but as a critical node where every layer must flow together without a single cold leak.